Friday 5 April 2013

chocolate and cheese?!

Whilst at home this week, I went to visit one of my old work friends, Ellie. We got chatting about the old days and how university is going for us both and we got onto the topic of my blog.  All of these memories started popping up from back when we used to cook and bake together all the time!  One particular memory that came up on the topic of cheesecake was from one of our shifts at work.  A member of staff had called in sick which left only Ellie and myself running the restaurant where we used to work.  It was manic.  One of the busiest shifts ever and by the end we were exhausted!  After we had closed, to cheer ourselves up we decided to pop across to Tesco's and buy some treats, one of which was a slice of chocolate cheesecake, and of course a bottle of wine.  And I suddenly had the idea that a chocolate cheesecake is something I would love to attempt as it was so delicious!  I began to search for a recipe, and hiding in the back of mum's cupboard was a recipe book from 1987 titled "The Colour Library Book of Creative Cooking." and the fact that it was named as a library, I thought I was sure to find a recipe in here...and I did!  
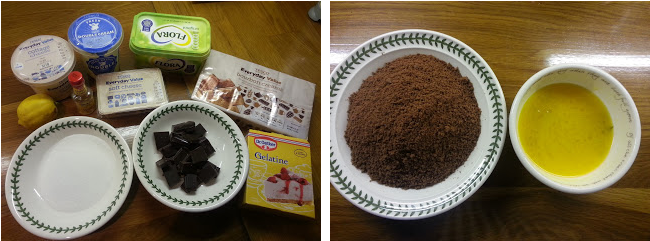


Ingredients:

275g Bourbon biscuits, finely crushed.
150g butter, melted.

Filling:  225g cottage cheese
225g full fat soft cheese
50g caster sugar
juice of 1/2 lemon
1/4 teaspoon vanilla essence
300ml single cream
1 tablespoon powdered gelatine
3 tablespoons warm water
75g plain dessert chocolate, broken into pieces.


Method:

1.  Mix the crushed biscuits with the butter.  Press on to the base and sides of an oiled 8 inch loose bottomed cake tin.  Cover and chill for 30 minutes until firm.
2.  To make the filling : press the cottage cheese through a nylon sieve into a mixing bowl.  Add the soft cheese and beat with a wooden spoon until well combined.
3.  Add the sugar, lemon juice, vanilla and cream and mix well.
4.  Sprinkle the gelatine over the water in a heatproof bowl.  Leave to soak for 2-3 minutes until spongy.  Place the bowl over a saucepan of simmering water and stir until the gelatine has dissolved.
5.  Remove from the heat, leave to cool slightly, the stir gradually into the cheese mixture.
6.  Put the chocolate pieces in a heatproof bowl and place over a pan of gently simmering water.  Heat until the chocolate has melted.
7.  Pour the cheese mixture on top of the biscuit crust, then drizzle the melted chocolate over and swilr in with the point of a skewer.
9.  Cover and chill for 3 hours.


This recipe I found was quite simple to follow and was laid out clearly and precisely in the book.  One thing that caught my attention straight away was the fact that it said to use single cream. Given that the chocolate orange cheesecake I did previously was made using single cream and didn't set, I decided to adjust the recipe and substitute single cream for double.  The biscuit base I thought was a wonderful idea as the cream from inside the bourbons added extra texture and flavour and was absolutely delicious.  But although the flavour was perfect, I once again found that there was not enough biscuit base to do as instructed and press the biscuit up the sides of the tin as well as on the bottom.
However I was a little dubious about the idea of using cottage cheese.  Cottage cheese is very lumpy so I was quite concerned about the texture this one might have.  Even once I had pressed it through the sieve as told in the method, it still wasn't very smooth, but I hoped for the best and kept going.  Once the soft cheese and the cream were mixed in it was all looking as I thought it should.
I am so glad i went for double cream rather than single as it set perfectly!  I may try it one day with single cream, just to see if it would work as well.  When it came to trying this cheesecake, I have to admit it is not one that I particularly like.  I find the flavour from the cottage cheese much too strong and slightly bitter, but my dad and brother disagreed, it's going down very well with them!  If I did make this again with the single cream, I think I would also be tempted to change the cottage cheese for more soft cheese instead. 
One thing I particularly liked about the recipe itself was the little box at the top of the page titled "Cook's Notes". It includes lots of little tips to make the recipe successful as well as serving and freezing suggestions!  I liked the idea of the serving suggestions :

"If liked, decorate the edge of the cheesecake with drained mandarin segments and sprinkle with chocolate vermicelli or strands.  Instead of fruit sprinkle coarsely grated chocolate round the edge."

But I decided to leave the cheesecake as it was as my family thought anymore flavour might be a little bit too  much considering the chocolate base and the cottage cheese.  I had a flick through the rest of the book and there is one on each page! It even tells you how many calories are in a slice of this cheesecake (but personally, I would rather not know that!)


Saturday 23 March 2013

Which is Which?

This time, I decided to consider a cheesecake bought from the shop.  How the texture, taste and appearance compared to that of a homemade cheesecake.  And this got me thinking.  As well as comparing it to a homemade cheesecake, I could use two of the same cheesecakes from different price ranges and see how they compare to each other.  So I am going to be exploring what really is the difference between supermarket value food, and finest.  I chose two from Tesco.  Both the same flavour and both titled "New York Cheesecake" , but priced and packaged very differently.  But first, I had to find some willing victims.  I persuaded ten people, friends and family, to tell me which cheesecake they preferred in taste, texture, and also the packaging.  


Everyone agreed that the Tesco finest cheesecake was more appealing in terms of packaging.  Their views considered the colours, and how most thought the bright blue of the Tesco value cheesecake was too bold and brash and looked a little cheap, especially considering it had the price of £2 displayed very clearly on the front.  They preferred the more sophisticated look of the Tesco finest cheesecake, and I have to agree.
When I took them out of the boxes, I was immediately swayed towards the finest cheesecake as it was definitely visually more appealing.
When it came to tasting however, I decided to have a little bit of fun.  Seeing as everyone preferred the packaging of the finest cheesecake, in my mind I thought people might be a little biased knowing which was the cheaper cheesecake in their tasting decisions.  So I blindfolded them!  And as you can see below, mum was looking a little bit worried......


Whilst all this was going on, mum reminded me of a game we used to play when i was younger.  We used to have to close our eyes and mum would put something in our hand to eat, and we would have to guess from the feel and flavour what it was and there was always so sort of prize at the end of this.  It also reminded me of one night when me and my friends had a few too many cocktails on a night out and were all craving something sweet! So we walked to the local Tesco's and bought ourselves a cheesecake to share, and we went for the Tesco value one.  We took it into the middle of town, sat on a bridge overlooking the river and finished off our night quite nicely with a nibble of cheesecake!
Once I had blindfolded my eager volunteers, I allowed them two bites of one cheesecake, followed by some water and then two bites of the next.  Switching which cheesecake I gave first each time so no one was sure which was which.  And overall the results were quite surprising.  The majority vote was for the value cheesecake!  Most people described the finest cheesecake as far too sweet, to the point where they didn't think they could finish a whole slice if it were given to them.  So although the appearance of the finest cheesecake was far more appealing than the value cheesecake, it seems that looks aren't everything.  Which I discovered myself with the chocolate orange recipe I tried.  Although the cheesecake looked wonderful, the cheesecake did not live up to expectations.

Can you guess which is which?


cherry delicious!

So, after the success of my first Nigella cheesecake, and the not so successful attempt at a Sainsbury's recipe, I decided to revert back to Nigella and try a recipe from one of her other books.  This one is titled "Nigella Express".  To me this read as everything inside would be quick and easy to make.  And it should have been....but then of course, I came along.  As always I managed to make things much more difficult for myself than they should have been.  Once again I love the introduction to the recipe, and this time she talks to us about her opinions of baked and non baked cheesecakes and how they have changed:

"I had always been a committed believer that the only true cheesecake was the proper, baked cheesecake, but now I'm not so sure.  This improper, unbaked cheesecake, feature of many a seventies dessert trolley, has entirely won me over."

In a sense, I do agree with her.  Although the other way around.  I used to think baked cheesecake could never be quite as good as a creamy, set in the fridge mix.  However, the banoffee recipe that I posted previously was fantastic and when I compare this to the fact that one of my non baked recipe's didn't set, I was beginning to think baked cheesecakes were the better option.  But this recipe is wonderful!


Ingredients

Base:
125g Digestive Biscuits
75g Soft Butter.

Cheese Mix:
300g Cream Cheese
60g Icing Sugar
1 Teaspoon Vanilla Extract
1/2 Teaspoon Lemon Juice
250ml Double Cream
1 Jar Dalfour Black Cherry.

Method:

1.   Blitx the biscuits in a food processor until beginning to turn the crumbs, then add the butter and whiz again to make the mixture clump.
2.  Press the mixture into a 20cm tin.
3.  Beat together the cream cheese, icing sugar, vanilla extract and lemon juice in a bowl until smooth.
4. Lightly whip the double cream and then fold into the cream cheese mixture.
5.  Spoon the cheesecake filling on top of the biscuit base and smooth with a spatula.  Put it in the fridge for 3 hours.
6.  When you are ready to serve the cheesecake, unmould it and spread the black cherry over the top.

Everything in this recipe and method went perfectly until it came to putting the cherry on top.  I bought the wrong cherry mix....typical of me really to grab the first one i saw.  So instead of being a thick sauce to spread over the top, I ended up with lots of whole cherries and a very liquid sauce.  Once again, mum was needed.  And she had the perfect solution.  I drained the sauce from the cherries and put this into a saucepan.  I then added 5 spoons of sugar and heated gently until it bubbled to thicken.  I popped this in the fridge to set and when i went to check it i had the perfect thick syrup to drizzle over the cherries which I had placed on top.  And I have to agree with what Nigella said in her introduction, that this unbaked recipe truly does compete with baked cheesecakes.  


When I think back about this cheesecake recipe,  it brings back so many different memories.  The first of which was a new addition to the family!  My Auntie had a little girl and it became noticeable that she was allergic to egg.  So mum began searching around for new recipe's that were specifically egg free and she found this one already in our cupboard.  Mum began collecting lots of recipe's that would be suitable in the years to come that didn't contain egg which would make things much easier when family came to visit!  The second memory that springs to mind is Christmas.  This used to be a family favourite before mum became diabetic and switched to the equally good low fat, low sugar recipe I made previously.  Every boxing day, mum would make this delicious cheesecake as our dessert and I can recall so many wonderful memories which have all been triggered by making this cheesecake!  All of my family sat around the table at lunch time, pulling the leftover crackers and playing games.  Had I not decided to make this one, perhaps some of these memories and days might have been forgotten.


Friday 15 March 2013

The Worst Of Sainsbury's Entertaining

This time around, I decided to try a recipe from a slightly older book.  The book I chose is called "The Best of Sainsbury's Entertaining" which I thought sounded perfect considering how recently we have been studying how food is used in certain texts to demonstrate a sense of status and can be used to entertain guests.  When flicking through the book initially, I noticed that each chapter had an introduction suggesting which occassions the food in the section could be used for and also includes tips on how to make your event its best.  The recipe I picked was for a chocolate orange cheesecake which to me sounded fantastic! And my dad, being quite a fan of terry's chocolate orange's, was rather keen on the idea as well.


The buffet party introduction seemed incredibly well linked to the course which I am currently studying.  Not only have we looked at food as a form of entertainment but also how and who is to prepare the food, particularly considering post war, a time when servants began to disappear and women had to manage on their own. It specifically states that;

"Buffet parties are the entertaining occasions favoured by
 busy people who have little help.  They are infinitely popular
with those who dislike formality."

This to me stated that the recipe's I would find here would be simple and quick to do.  The overall format of the recipe was well laid out and easy to follow...to an extent.  One problem I did find is that the ingredients listed weren't seperated into base and cheese mix so I guessed (and doubled checked with mum) and once that was sorted of I went!

Ingredients

50g Butter
125g Digestive Biscuits
25g Demerera Sugar
454g Curd Cheese
50g Caster Sugar
Grated Rind of Two Oranges
250ml Single Cream
15g Gelatine, soaked in 3 tablespoons cold water
50g Plain Chocolate, melted
Whipped Cream to Decorate.


Method:

Melt the butter in a pan and stir in the biscuit crumbs and sugar.  Spread the mixture over the base of a 20cm tin and press down.  Leave in the refrigerator until firm.
Place the cheese in a bowl with the sugar and orange rind and beat until smooth.  Strain the orange juice and add to the mixture, then gradually stir in the cream.
Heat the gelatine gently until dissolved, then stir into the cheese mixture.  Pour over the crumb base.  Pour the cooled, melted chocolate over the top, swirling with a fork to give a marbled effect.  Chill in the refrigerator until set.  Remove from the fridge and pipe cream around the edge to serve.

I came across a problem with this recipe almost instantly.  Once I had made the biscuit base mix, and put it into the tin that they suggested, it was immediately clear...there wasn't nearly enough.  I had to double the mixture in order to cover the tin!  But once I'd done that, I thought well that's the worst of it!  Turns out that wasn't exactly true.
The cheese mix itself was quite simple and the method clear, but I did begin to worry about how watery it was.  The Banoffee cheesecake I made previously was also quite watery but it was baked so I wasn't worried about that one setting.  This one however is one to be put in the fridge to set.  So because it was so runny, I thought the best thing to do would be to leave it overnight.  
When I came downstairs the next day I checked on the cake, and it was still quite wobbly.  It had set on top but wobbled a lot.  So I left it until the afternoon.  With mum's assistance, of course, we removed the outer casing of the tin.  And the cheesecake stayed upright....for a while.  Once the first slice had been cut, it started to slip.  Not completely but it didn't hold it's shape as it should have done.  This cheesecake was the most appealing visually so far, the chocolate decoration looked wonderful, but when it came to tasting it, I wouldn't say the same.  The flavour's of the cheesecake were wonderful!  The orange was tangy but sweet and the chocolate on top added even more flavour.  But the texture definitely wasn't right which confused me as I followed the recipe exactly.  I have boiled it down to a few things which I would change about the recipe.  Firstly, I would definitely double the quantities of the biscuit base as it needed much more than stated.  Secondly, I would suggest a certain amount of orange juice to use and I feel there may have been too much and that is one cause for the cake not setting properly.  And finally, I would change the single cream to double or extra thick cream.  All this aspects put together I personally think would have made a much firmer, set cheesecake.  But at least it tasted good!  Mum even used it for a dinner party she was having with her friends.  One of which happens to be the head chef of Acton Scott Farming Museum and she was kind enough to write a short review for me of what she thought:


"Base : Tasted good but needed more biscuits.
Cheesecake : Tasted very nice but was too loose.  Next time use more gelatine or less liquid.  I the the recipe was at fault here and should have used double cream also.
Chocolate : Looked beautiful, but due to the very cold temperature used in order to set the cheesecake it was too hard to cut.  If the consistency of the cheesecake had been firmer and served at room temperature the swirling pattern would have been perfect."

So it would appear that she agrees with me completely in the recipe being at fault here.  If I was to attempt this cheesecake again I would combine both mine and her alterations to try and rectify the problems.


Friday 8 March 2013

just call me Nigella...

For this next cheesecake, I delved into one of my favorite cookbooks titled "Kitchen Recipes From the Heart of the Home"  by Nigella Lawson.  I absolutely love her recipes and really enjoy making them! What I've always loved about her is the fact that she provides some sort of memory or event that ties in with each recipe.  When I first bought one of her books and saw all the print introducing the recipe, I did what a lot of people would do...skip straight to the ingredients.  But I really enjoy reading them now! I feel like i'm watching one of her programme's on the television rather than reading a book.  Each one contains something different and this was no exception.  Being a student I found her introduction very relevant as she talks a lot about the wasting of food and how she can't stand to do so.  Considering the students budget, I think it's safe to say that none of us can really afford to waste food!  I was a little apprehensive about this recipe as it seemed a lot more complicated than the others I've tried so far but I thought why not! And in fact, it wasn't as bad as i thought!  Before she even begins to list the ingredients needed, Nigella mentions a few tips about the mixture which you definitely need to know before you start! For example, she tells you that the cream cheese must be at room temperature as it needs to be left out of the fridge for quite a while for it to warm up slightly. 

Ingredients:
Base.
250g Digestive Biscuits
75g soft unsalted butter.

Cheese Mix:
4 Bananas
60ml Lemon Juice
700g Cream Cheese
6 Eggs
150g Soft Light Brown Sugar

Toffee Sauce:
100g Soft Unsalted Butter
125ml Golden Syrup
75g Soft Light Brown Sugar.


Method.

1.  Pre-heat the oven to 170 degrees/ gas mark three and put a full kettle to boil.  Wrap the outside of the tin with a layer of clingfilm then wrap that in a layer of tin foil.  This will protect the cheesecake in its water bath.
2.  Process the digestive biscuits with the butter until you have a sandy rubble.  Press this into the bottom of the tin and set in the fridge.
3.  Mash the bananas well with a fork and add the lemon juice.  Set aside.
4.  Process the cream cheese until smooth, then add the eggs and sugar.  Last of all add the mashed bananas and lemon juice.  Process until smooth.
5.  Take the biscuit lined tin from the fridge and sit in the middle of a roasting tin.  Pour the cheese mix onto the top.
6.  Pour the boiled water into the roasting tin until it comes about halfway up the cheesecake tin.  Place the roasting tin into the oven.  Cook for 1 hour and 10 minutes.  
7.  Remove the roasting tin from the oven and take the cheesecake from the roasting tin.  Gently peel away the layers of clingfilm and tin foil and let the cheesecake cool.  Put in the fridge to cool and remove half an hour before serving.
8.  To make the sauce, melt the butter, golden syrup and sugar in a saucepan over a gentle heat until it bubbles.  Let it continue to bubble for 1-2 minutes.  It will be a foamy, amber mixture that should resemble liquid honeycomb.  Let it cool slightly before pouring into a jug.  It will thicken as it cools.

The method itself was very easy and extremely well presented.  It wasn't in a big long paragraph like some recipes are.  Each new thing you had to do had a separate bullet point and was in the exact order in which everything needed doing.  The first thing you are told to do just after the mention of the cheese needing to be at room temperature is to pre-heat the oven, which I would more than likely have forgotten otherwise.  The recipe was so easy to follow that I didn't even need mum this time! Except for when I did....I began mixing everything together as was stated, but when I stopped and had a look, the cheese, lemon juice, bananas, eggs and sugar were looking like a pale lumpy mess.  The biscuit base had worked wonderfully and so I was really hoping the mix would turn out just as well.  But unfortunately I did get a bit stuck.  And this was the point I felt I needed mum.  Luckily she had a very simple solution : put it in the blender which worked perfectly!  One thing that I feel was missing from this recipe was how the mix should look.  I was certain my lumpy mess wasn't right and mum thought exactly the same.  And instead of the usual thick creamy mix, this was really quite like a liquid so I was a little worried that it would leak into the base of the cheesecake, but thankfully as I had remembered to set the base in the fridge previously, it sat nicely on top. 


But all in all i was extremely proud of this cheesecake!  It even resembled the picture provided in the book of the finished product which makes a change for me.  I did feel the need to make a few little changes though.  Instead of using four bananas, which i'm not that keen on, i decided to cut down to two and a half so the flavor wasn't too overpowering and I'm so glad I did.  You could definitely taste the banana but instead of being the only thing you could taste, the base and cheese mix were still there.  I also had to adapt the topping.  As stated before, my mum is a diabetic so instead of smearing the toffee sauce which, lets face it, is basically pure sugar all over the top as suggested, I put it on the side so everyone could decide how much they wanted, or have none in my mums case.   In the recipe Nigella tells you that you can leave some of the sauce on the side "for people to add greedily as they eat" which really made me laugh as it just sums up my brother completely!  I always remember whenever there is dessert on the table, he's the first one to go for it, if there's any left at the end he'll be the one finishing it off!  He does love his food.  And I have to say, that this has definitely topped all of the others so far...definitely one to save for another day!


Tuesday 26 February 2013

One of my Own....

For this recipe, I decided to go back to my first year of university.  We had a bit of a thing for cheesecake and of course, being students, we hadn't got a clue how to make cheesecake, so we guessed! this could have gone one way or another, but luckily for us, it was edible and quite delicious!  It was so much fun making it, and as you can imagine, there was a lot of mess.  We thought of a lot of ideas for a flavour and eventually decided on raspberry and white chocolate.  


When I think back to that year, there seem to be quite a few memories surrounding cheesecake!! For one, I remember a week that I was really ill and to cheer me up my flatmates went down to the shops and bought me a cheesecake!  Then one day, we decided to create our own for someones birthday which is the recipe I am doing here.  My flat mates even adapted this particular recipe for my birthday that year and made it with chocolate covered honeycomb which worked just as well. And of course, it didn't last very long...I asked one of my flat mates that year if she remembered this particular time and this is what she had to say:


The recipe we made is quite simple:

Base
About half a packet of digestive biscuits crushed.
2 tablespoons of melted butter.

Cheese mix:
2 regular tubs of Philadelphia or supermarket equivalent.
250ml of double cream, whipped until thick.
1tsp vanilla essence.
Sugar/sweetener to taste.
One large milky bar (melted).
Half a punnet of raspberries.


It is such a simple method that I was able to do it from memory. 

1.  Crush the biscuits until they are like breadcrumbs.
2.  Melt the butter and add this to the mixture until it has all bonded together.  Once this is done, spread the biscuit mix over the base of a tin.  I used an eight inch tin which worked very well.  Put this in the fridge to set.
3.  Whip the cream until thick and mix together with the cheese, sweetener and vanilla essence.  
4.  Add in the raspberries and melted white chocolate, saving a few raspberries for decoration.
5.  Spoon the cheese mixture onto the set biscuit base and decorate with the raspberries.  Then put back in the fridge to set.  Overnight work best for this recipe.

Turns out that you can use so many different things as utensils when lacking in a student kitchen! We ended up using a flat base glass to crush the biscuits as no one had a rolling pin or a blender.  It worked quite well.  But this time, I had mummy's kitchen to help me out, which is full of useful tools which half of them, I'm sure, have never been used. It took me no more than half an hour to make this and only about an hour for it to set so quite a quick easy recipe to do.  What I personally love most about it is that when you mix in the raspberries and they start to crush, all the juice starts to turn the mixture pink so you end up with a lovely pink swirl running through it.  However, unfortunately I used the wrong tin to make it in....it was far too wide so the cheese mix on top wasn't thick enough, as you can see in the pictures below, which was slightly disappointing, but it still tasted just as good!  The base was perfect and the cheese mix was quite sweet because of the melted chocolate but I loved it.  It adds more texture and flavour along with everything else.  Another down side is that once again I managed to cover mum's kitchen in all sorts of mess....pretty sure I'm not going to be allowed to cook there again.  But my brother on the other hand was incredibly grateful and definitely enjoyed my newest creation!  Once I had come back to university, mum assured me that once again, it didn't last very long, that I'm sure is down to my brother.


Sunday 10 February 2013

A Very Special Recipe.

As stated previously, this first recipe I decided to include has been kindly donated by my mother.  The inspiration for this particular recipe was my mum herself who, being a diabetic, had to forgo her love of cheesecake for quite sometime before deciding it was time she tried some sugar free and half sugar recipes.  She played around with different recipes trying out sugar substitutes and halving sugar amounts to find something that was suitable for her, but still tasted just as good.  This particular recipe has been a family favourite in our house for a while now and I imagine, and hope, it will remain this way.  Mum said to me as I began to make this one that 

"Having diabetes doesn't mean you can't have your cake and eat it!"  


Ingredients:

12 Digestive Biscuits
2oz Butter
500g Quark
3 Eggs
3oz Sugar and 3oz sweetener
Lemon Zest
2tsp Vanilla Extract
250g Creme Fraiche


Personally I think this recipe is absolutely fantastic!  I decided to go with the half sugar quantities when making this as I felt a no sugar cheesecake could be a bit adventurous for my first ever attempt.  The finished product was almost as good as the way mum makes it, but of course, not quite that good as no one can beat mums cooking.  The consistency was perfect and the base crunchy but not overdone.  Being a baked cheesecake, which I didn't know before exploring mums recipe tin, I wasn't sure how the consistency would compare to fresh cream cheese recipes but I thought it was just as good if not better!  I was also a little bit worried about baking a cheesecake, because i have a tendency to forget that I've put something in the oven.  But in this case it turned out perfectly with minimal disaster, (except for the mess I left behind.  Needless to say, mum was not impressed).


As well as trying to make this a low sugar cheesecake, mum has also managed to convert it to a low fat one by replacing full fat cream cheese with Quark instead, which is a bonus because it means we can have that tiny bit more without feeling quite so guilty about it.  However, there was no method included on this recipe which meant I had to keep running backwards and forwards to grab mum to ask about the next bit!  I guess by now she has perfected the recipe so much that she doesn't need a method any more, unfortunately, I did. I managed to persuade her to write out a method for me in the end though so I could include it for you all here:


Method:

1.  Heat oven to 160c/fan 140c/or gas 3.

2.  Crush the biscuits in a strong food bag with a rolling pin.  Mix together with the butter and press into a 20cm springform or loose-based cake tin.  Heat oven to 160c/fan 140c/or gas 3.

3. Put the remaining cheesecake ingredients, except the fruit topping into a food processor and process until smooth.  Pour into the tin and shake to level.

4.  Bake for 40 mins, then turn off oven and leave cheesecake to cool for 1 hour.  When completely cool, chill overnight. Don't worry if it has cracked on top, as this will be hidden by the fruit.
5.  Remove the cheesecake from the tin onto a serving plate and allow to cool. 
6.  Scatter over the fruit and dust with icing sugar if required.


Overall, I think this recipe works wonderfully as it means everyone can enjoy a piece!  Being low sugar and low fat in my opinion has made this cheesecake even more enjoyable as I don't feel as bad for eating it! It made a lovely finish to a nice sit down family meal, which everyone could appreciate.  It's almost became a tradition last year, that every time I would come home from university for a visit, which was not very often at all, that she should make a homemade lasagne and this cheesecake.  It always gave me something to look forward to after the long drive home.